Introduction
When the United States entered World War 1 in April 1917, the Army had a problem. It was small. Around 127,000 regular soldiers were on active duty. Suddenly, millions had to be trained and equipped. That meant uniforms. Fast.
The first issue? Supply and design gaps. Many new recruits wore old pre-war service dress. Some uniforms were not made for trench mud, cold rain, and long marches. Shoes wore out. Wool shrank. Overseas shipping delayed replacements. Soldiers of General John J. Pershing’s American Expeditionary Forces reached France in 1917 and found that European trench warfare demanded tougher clothing.
Think about standing in wet trenches for hours. Imagine wearing heavy wool that stays damp. Morale drops quickly when comfort drops. Uniforms were not just clothing. They were protection, identity, and pride.
The solution came through rapid production, Quartermaster redesign, and strict material standards. By 1918, millions of improved olive drab wool uniforms were produced. In this guide, we will break down the real specifications, field use, and how you can make an authentic replica today using documented details.
WW1 Uniform Problems and Key Features
Early Problems in 1917
When the Selective Service Act began drafting men in 1917, uniform production exploded. US Army Quartermaster records show over 3 million men were mobilized by 1918. Factories had to meet demand quickly.
Early service coats used olive drab wool serge. Fabric weight averaged about 16 ounces per yard for field uniforms. Wool was durable but heavy when wet. In cold weather it helped. In damp trenches it absorbed water.
Shoes were another issue. The 1917 field shoe had a leather sole with hobnails added later for traction. Before improvements, some soles wore down after long marches.
Color consistency also varied. Olive drab shades differed by contractor. That mattered for supply and appearance.
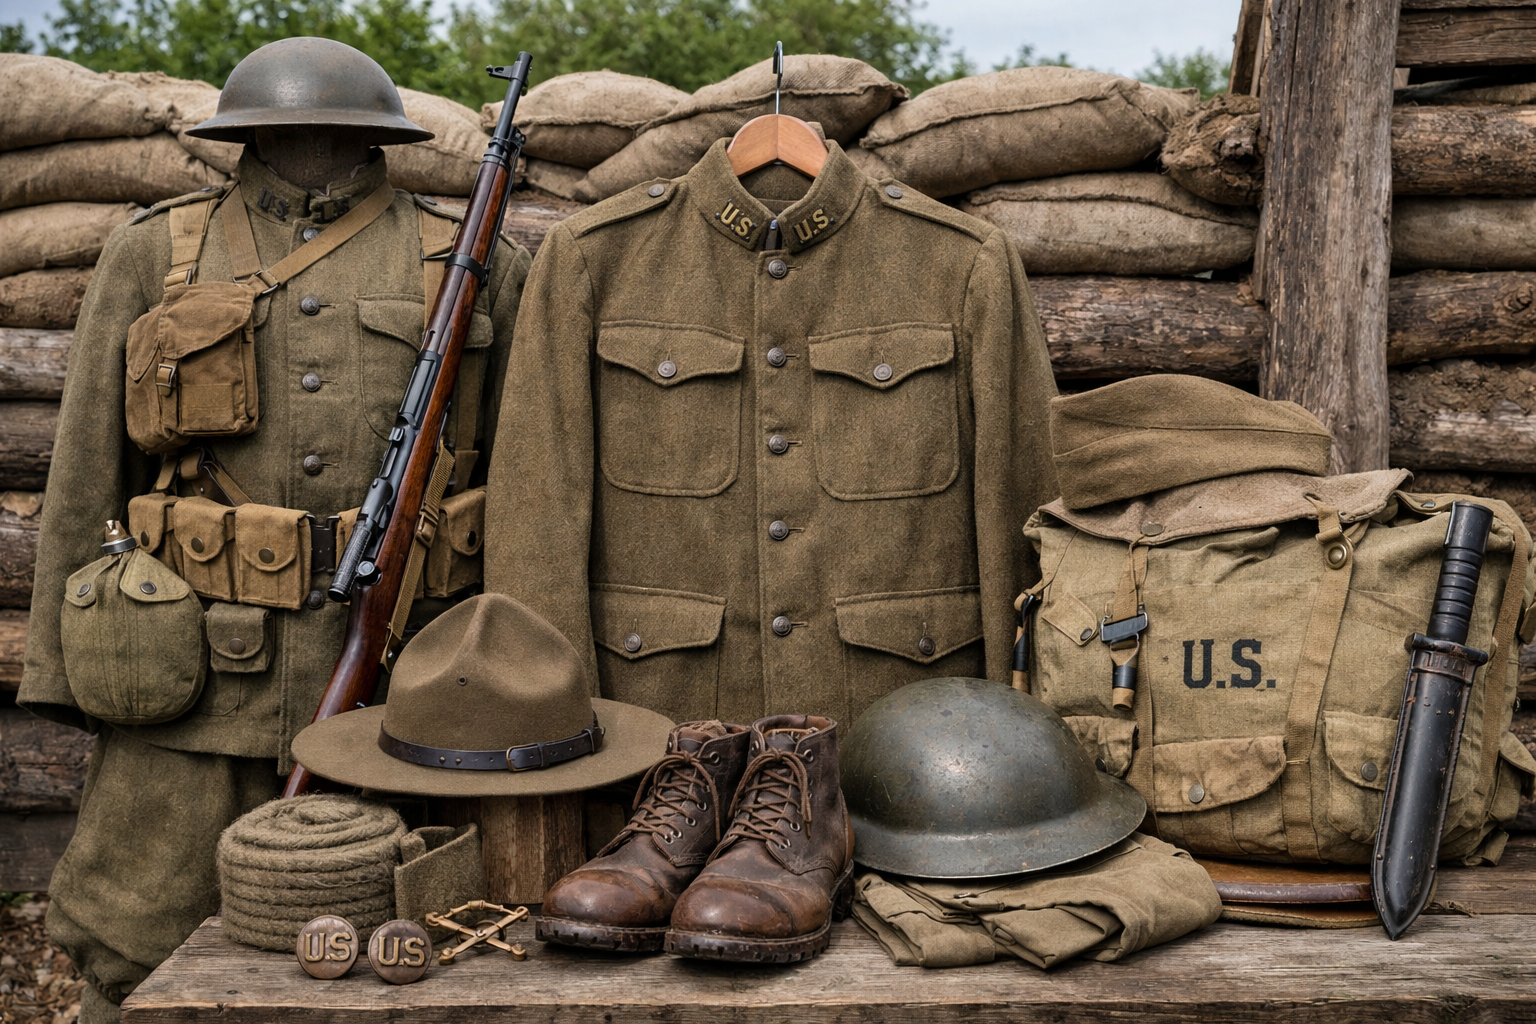
Standard Features of the 1917–1918 Uniform
By 1918, the US Army standardized many elements.
The Service Coat, Model 1917:
-
Olive drab wool
-
Stand and fall collar
-
Four front pockets with flaps
-
Bronze US collar discs and branch insignia
-
Shoulder straps for rank insignia
Trousers:
-
Olive drab wool breeches
-
Reinforced seat and knees
-
Designed to tuck into puttees
Puttees:
-
Wool leg wraps about 9 feet long
-
Wrapped from ankle to knee
-
Used instead of tall boots
Shirt:
-
Olive drab flannel wool
-
Pullover style with chest pocket
Headgear:
-
Campaign hat early in war
-
Overseas cap introduced in 1918 for use in France
-
Steel helmet (M1917) based on British design
Production numbers were high. In 1918 alone, millions of service coats and trousers were issued. The Quartermaster Corps reported producing over 2 million pairs of field shoes in a single year to meet demand.
Real-World Field Example
Pershing’s AEF troops in France in 1918 wore the improved versions during the Meuse-Argonne Offensive. This was the largest US operation of the war. Over 1 million American soldiers participated. Uniform durability mattered. Troops marched long distances and faced cold autumn weather. Wool weight and layered design helped retain body heat during October fighting.
Pros & Cons: Original vs Modern Replicas
Original WW1 Uniforms
Pros:
-
Made to official Quartermaster specs
-
Authentic fabric weight (around 16 oz wool)
-
Period-correct stitching and hardware
-
Issued bronze insignia and real contract tags
Cons:
-
Fragile after 100+ years
-
Wool may have moth damage
-
Hard to find correct size
-
High cost in collector market
-
Not practical for regular wear
Original pieces from 1917–1918 were mass produced. But survival rate today is low. Museums and private collectors preserve many examples. Wearing an original in a reenactment risks damage.
Modern Replicas
Pros:
-
Easier to size correctly
-
Durable for reenactment use
-
Lower cost than originals
-
Can match weight and cut if made correctly
Cons:
-
Some replicas use lighter wool
-
Incorrect shade of olive drab
-
Modern stitching methods visible
-
Synthetic blends reduce accuracy
Authenticity depends on details. If a replica uses 12 oz wool instead of 16 oz, it drapes differently. If collar discs are brass instead of bronze finish, accuracy drops.
Reenactment groups often score authenticity based on fabric weight, pocket shape, button type, and insignia placement. Small details matter. The difference between a good replica and a poor one is often in the fabric and hardware.
How to Make WW1 Era US Uniforms
Step 1: Study Official Specifications
Start with documented measurements. Look at Model 1917 service coat patterns. Note pocket size and placement. Shoulder strap width is about 1.5 inches. Collar height is moderate, not tall.
Use reference books or museum archives for pattern dimensions.
Step 2: Choose Correct Fabric
Select 100% wool serge in olive drab. Target weight: close to 16 ounces per yard. Avoid thin wool blends. The fabric should feel firm and structured.
For shirt and breeches, use wool flannel of similar shade.
Avoid bright green. WW1 olive drab was muted brown-green.
Step 3: Cut and Sew the Service Coat
-
Cut four front pockets with scalloped flaps.
-
Add pleats to upper pockets.
-
Install bronze style buttons.
-
Sew shoulder straps aligned with collar seam.
Use cotton thread in matching color. Machine stitching is acceptable but avoid modern visible topstitch styles.
Step 4: Make the Breeches
WW1 breeches are not straight trousers. They widen at the thigh and taper below the knee. Reinforce the inner leg area.
Add lace-up or button closure at calf. Ensure fit allows wrapping puttees comfortably.
Step 5: Add Leg Wraps and Footwear
Puttees can be made from wool strips about 3 inches wide and 9 feet long. Wrap tightly from ankle upward.
For footwear, use reproduction M1917 field shoes with hobnails if possible. Leather should be thick, around 7–8 ounce leather weight.
Step 6: Headgear and Insignia
For early 1917 look, use a campaign hat with Montana peak shape. For 1918 AEF look, use overseas cap.
Add correct bronze “US” collar discs and branch insignia such as infantry crossed rifles.
Rank insignia for officers was sewn on shoulder straps. Enlisted ranks wore chevrons on sleeves.
Step 7: Final Inspection
Compare your replica with original photographs from 1918. Check pocket alignment, collar shape, and color tone. Accuracy improves when small details match.
Real-World Examples & Case Study
Many WW1 reenactment groups in the United States use authenticity checklists. Some groups report scoring systems where uniforms are rated on fabric accuracy, correct insignia, and period footwear. Units that switch from blended wool to correct 16 oz wool often see higher authenticity ratings during inspections. Museums also compare replica weight and weave density against original samples. Small changes like correct bronze discs instead of shiny brass can improve score results significantly.
FAQs
-
What color was WW1 US uniform?
Olive drab brown-green shade. -
How heavy was the wool?
Around 16 ounces per yard for service coat fabric. -
Did soldiers wear helmets?
Yes, the M1917 steel helmet in combat zones. -
What are puttees?
Long wool leg wraps worn over lower legs. -
Were uniforms mass produced?
Yes, millions were produced in 1917–1918. -
Can I use blended wool?
For accuracy, 100% wool is better.
Conclusion
WW1 Era US uniforms were born from pressure. Rapid mobilization exposed design gaps. Wet trenches tested wool and leather. Morale suffered when clothing failed. The solution came through standardization, correct fabric weight, and large-scale Quartermaster production.
Today, you can recreate that history. Use documented specs. Choose proper wool weight. Follow original pocket and insignia placement. Focus on facts, not guesswork.
When you wear a correct replica, you understand what those soldiers carried on their shoulders in 1918. Try building one. Measure carefully. Match the records. Keep it accurate.